本文最后更新于 159 天前,其中的信息可能已经有所发展或是发生改变。
1. 分解
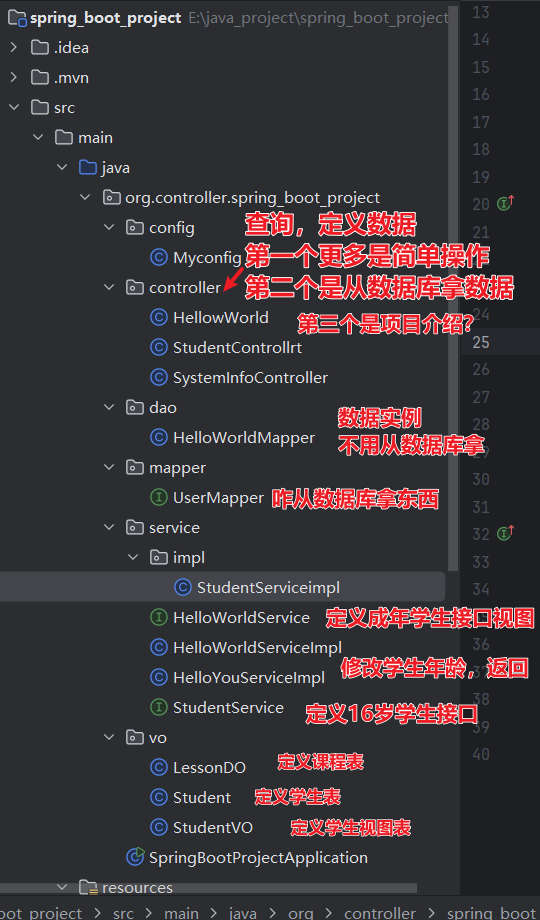
项目流程
| 层级 | 组件 | 职责 | 示例 |
|---|---|---|---|
| 控制层 | Controller | 接收请求,返回响应 | SystemInfoController |
| 业务层 | Service | 处理业务逻辑 | StudentServiceImpl |
| 数据层 | Mapper | 数据库操作 | StudentMapper |
| 视图层 | VO | 前端数据展示 | StudentVO |
| 数据层 | DO | 数据库映射 | LessonDO |
流程
HTTP Request
     ↓
┌─────────────────┐
│  Controller     │ ←─ 参数校验、API文档
│  (@RestController)│
└─────────────────┘
     ↓
┌─────────────────┐
│   Service       │ ←─ 业务逻辑、事务管理
│  (接口+实现类)   │
└─────────────────┘
     ↓
┌─────────────────┐
│    Mapper       │ ←─ 数据持久化、SQL映射
│   (MyBatis)     │
└─────────────────┘
     ↓
┌─────────────────┐
│    Database     │ ←─ 数据存储
│   (MySQL/其他)   │
└─────────────────┘
1. 视图
可以简单理解为类/蓝图。
可以进行封装,调用,对spring boot的解耦十分有用。
2. 环境配置
1. 搭建顺序
| 搭建顺序 | 对应组件 | 作用说明 | 简单说明 |
|---|---|---|---|
| 1. VO (视图对象) | StudentVO LessonVO |
• 定义API返回数据结构 • 数据安全过滤 • 前端展示格式定制。搭建顺序 | 定义要展示的数据 |
| 1. VO (视图对象)2. DAO (数据访问层) | StudentVO LessonVO``StudentMapper UserMapper HelloWorldMapper |
• 定义API返回数据结构 • 数据安全过滤 • 前端展示格式定制• 数据库CRUD操作 • SQL映射配置 • 数据持久化处理 | 定义”如何存取数据” |
| 2. DAO (数据访问层) | StudentMapper UserMapper HelloWorldMapper``StudentService HelloWorldService StudentServiceImpl |
• 数据库CRUD操作 • S | 定义业务逻辑 |
| 3. Service (服务层) | StudentService HelloWorldService StudentServiceImpl |
• 业务逻辑处理 • 事务管理 • 数据组装转换 | 定义”提供什么接口”去完成业务逻辑 |
| 4. Controller (控制层) | SystemInfoController StudentController``MyConfig application.properties |
• 接收HTTP请求 • 调用Service层 • 返回API响应• 应用配置管理 • 组件注册 • 参数配置 | 定义接口 |
| 5. Config (配置层) | MyConfigapplication.properties |
• 应用配置管理 • 组件注册 • 参数配置 |
组件 |
记得在对照pon.xml配置中添加依赖:
<dependency>

<groupId>org.springframework.boot</groupId>

<artifactId>spring-boot-starter-test</artifactId>

<scope>test</scope>
</dependency>
// mybatis插件

<dependency>

<groupId>com.baomidou</groupId>

<artifactId>mybatis-plus-spring-boot3-starter</artifactId>

<version>3.5.14</version>
        </dependency>
3. 搭建
1. vo
1. StudentVo
package org.controller.spring_boot_project.vo;

import com.fasterxml.jackson.annotation.JsonProperty;
import lombok.Data;

@Data
//它自动为类生成常用的方法。我们只用自己定义,不需要使用set,get
public class StudentVO {
    Long id;
    int age;
    String name;
    String email;
    @JsonProperty("namessss")
//  用于指定 JSON 字段的映射关系。
//   Java 对象中的字段 userName
//在 JSON 中对应的字段名是 "namessss"
    String userName;
}@Data:自动生成 get,set方法,可以不用自己重复打那么多行
2. student
package org.controller.spring_boot_project.vo;

import com.baomidou.mybatisplus.annotation.TableName;
import lombok.Data;
//创建视图-类似java类
@Data
@TableName("`user`")
public class Student {
    Long id;
    int age;
    String name;
    String email;
    String userName;
}
//定义属性@TableName(“user“):把数据映射到user数据表里
3. lessondo
package org.controller.spring_boot_project.vo;
//数据对象,课程表
public class LessonDO {
    private int id;
    private String title;
    private String description;
    private String teacher;
}
2. dao
1. HelloWorldMapper
package org.controller.spring_boot_project.dao;

import org.controller.spring_boot_project.vo.Student;
import org.springframework.stereotype.Component;

//创建实例,数据库映射,大概就是先创建一个数据库实例,不用从数据库调用的那种
@Component
public class HelloWorldMapper {

    public Student getOneStudent(){
        Student student=new Student();
        student.setAge(18);
        student.setName("lilei");
        return student;
    }
}
@Component 声明这是创建了一个具体实例的意思。
- 实例:就是数据的意思
- 这样的好处是可以不用去数据库就能获取测试的数据
3. mapper
1. UserMapper
package org.controller.spring_boot_project.mapper;

import com.baomidou.mybatisplus.core.mapper.BaseMapper;
import org.apache.ibatis.annotations.Mapper;
import org.apache.ibatis.annotations.Select;
import org.controller.spring_boot_project.vo.Student;

import java.util.List;
//对数据库的操作
@Mapper
public interface UserMapper extends BaseMapper
<Student> {

    @Select("SELECT * FROM `user` WHERE `age` = #{age}")
    List
<Student> selectByAge(Integer age);
}
@Mapper:标志这是mapper层的意思
- 这样就可以用mapper的逻辑理解这些代码
@Select: 选择语句的意思
`List
selectByAge(Integer age)`: 1. `selectByAge(Integer age)`: 以年龄查找 2. `List ` :把查找的数据好的存在这个列表中 #### 4. service ##### 1. HelloWorldService接口 “`java package org.controller.spring_boot_project.service; import org.controller.spring_boot_project.vo.Student; //创建接口 public interface HelloWorldService { public Student getStudent(); } “` 定义一个方法 ##### 2. StudentService接口 “`java package org.controller.spring_boot_project.service; import java.util.List; import org.controller.spring_boot_project.vo.Student; public interface StudentService { Student getStudentById(int id); List getStudentsByAge(int age); } “` 定义方法并存在列表里 ##### 3. HelloWorldServiceImpl “`java package org.controller.spring_boot_project.service; import jakarta.annotation.Resource; import org.controller.spring_boot_project.dao.HelloWorldMapper; import org.controller.spring_boot_project.vo.Student; import org.springframework.stereotype.Service; @Service(“HelloWorldServiceImpl”) public class HelloWorldServiceImpl implements HelloWorldService { @Resource // 数据注入,访问sql层 public HelloWorldMapper helloWorldMapper; // 业务方法实现,修改数据为16 @Override public Student getStudent(){ Student student = helloWorldMapper.getOneStudent(); student.setAge(16); return student; } } “` `@Service`: 和程序注明这是service层 `@Resource`:访问dao层的`usermapper`,调用操作逻辑 `@Override`:调用父类的方法`getStudent()`,把学生年龄修改16 ##### 4. HelloYouServiceImpl “`java package org.controller.spring_boot_project.service; import jakarta.annotation.Resource; import org.controller.spring_boot_project.dao.HelloWorldMapper; import org.controller.spring_boot_project.vo.Student; import org.springframework.stereotype.Service; @Service(“HelloYouServiceImpl”) public class HelloYouServiceImpl implements HelloWorldService{ @Resource public HelloWorldMapper helloWorldMapper; @Override public Student getStudent() { Student student = helloWorldMapper.getOneStudent(); student.setAge(22); // 修改数据为22 return student; } // 主要区别: // 两个类实现了相同的接口,但提供了不同的业务逻辑(年龄设置不同), // 通过不同的 Bean 名称来区分,可以在不同场景下选择使用不同的实现。 } “` `@Resource`:访问dao层的`helloworldmapper`,调用操作逻辑 `@Override`:调用父类的方法`getStudent()`,把学生年龄修改22 ##### 5. StudentServiceimpl “`java package org.controller.spring_boot_project.service.impl; import com.baomidou.mybatisplus.core.conditions.query.QueryWrapper; import jakarta.annotation.Resource; import org.controller.spring_boot_project.mapper.UserMapper; import org.controller.spring_boot_project.service.StudentService; import org.controller.spring_boot_project.vo.Student; import org.springframework.stereotype.Service; import java.util.List; @Service public class StudentServiceimpl implements StudentService { @Resource UserMapper userMapper; @Override public Student getStudentById(int id) { Student student = userMapper.selectById(id); //使用条件判断 if(student.getAge() > 18){ // // 成年学生返回空对象 return new Student(); } return student; } @Override public List getStudentsByAge(int age) { //直接去数据库找数据,把找到的数据返回回到List students里 QueryWrapper queryWrapper = new QueryWrapper(); //等价于 where ‘age’ = #{age} queryWrapper.eq(“age”, age); //age是前端输入的数据 List students = userMapper.selectList(queryWrapper); return students; //如果有,就把students的数据返回到前端展示出来 } } “` `implements`:一旦用了 `implements`,就**必须**实现指定接口中的所有方法。`{}`里的都是条件 – 这里是调用了 `StudentService`接口 – 如果年龄大于18,就返回一个空值 #### 5. controller ##### 1. HellowWorld “`java package org.controller.spring_boot_project.controller; import org.controller.spring_boot_project.config.Myconfig; import org.controller.spring_boot_project.mapper.UserMapper; import org.controller.spring_boot_project.service.HelloWorldService; import org.controller.spring_boot_project.vo.Student; import org.controller.spring_boot_project.vo.StudentVO; import org.springframework.beans.BeanUtils; import org.springframework.beans.factory.annotation.Autowired; import org.springframework.beans.factory.annotation.Qualifier; import org.springframework.web.bind.annotation.*; import java.util.ArrayList; import java.util.List; import java.util.logging.Logger; //添加注解 @RestController @RequestMapping(“/new”) public class HellowWorld { // 加注解 @Autowired @Qualifier(“HelloWorldServiceImpl”) private HelloWorldService helloWorldService; @Autowired public Myconfig myconfig; @Autowired public UserMapper userMapper; // 调用接口和业务啥的 Student student=new Student(); Logger logger = Logger.getLogger(HellowWorld.class.getName()); //创建一个学生对象 和 创建一个日志记录器。日志记录器可以记录程序运行中的各种信息 // 调用方法 @GetMapping(“/hello”) @ResponseBody public String helloWorld() { // Integer int float boolean // sout //(); 中文符号不能用 // System.out.println(“run this”); logger.warning(“logger”); return “hello”; } //使用这个方法,后端会给前端返回一个log日志 //另一个方法,参数测试接口 //访问方式:/hellowithparam?name=张三&age=18 //返回:”张三18″ @RequestMapping(“/hellowithparam”) public String helloWorldwithParm(@RequestParam() String name, @RequestParam() String age) { System.out.println(name + ” ” + age); return name + age; } //接受json数据 //POST请求,输入的Body中传JSON:{“name”:”张三”,”age”:18} @RequestMapping(“/student-body”) public Student studentBody(@RequestBody Student student) { System.out.println(student); return student; } //根据ID查询学生 @RequestMapping(“/student/{id}”) public Student studentId(@PathVariable String id) { // System.out.println(student); Student student1 = userMapper.selectById(id); return student1; } //查询指定年龄的学生,并转换成VO对象返回 //访问方式:/student?age=18 //返回:学生VO列表(可能隐藏了敏感字段) @RequestMapping(“/student”) public List getStudentByAge(@RequestParam Integer age){ // System.out.println(student); List studentList = userMapper.selectByAge(age); ArrayList studentVOArrayList = new ArrayList(); for (Student student : studentList) { StudentVO studentVO = new StudentVO(); BeanUtils.copyProperties(student, studentVO); studentVOArrayList.add(studentVO); } return studentVOArrayList; } // pathVariable 后面的名字要对应 url上面的这个ids 一模一样 //访问方式:/123/student //返回:”123″ @RequestMapping(“/{ids}/student”) public String studentIdFront(@PathVariable String ids) { // System.out.println(student); return ids; } //获取学生信息 //提供一个获取学生信息的接口,当有人访问这个接口时,返回一个学生的数据。 @RequestMapping(“/getStudent”) public Student getStudent() { logger.warning(“getStudent”); Student s = helloWorldService.getStudent(); return s; } //获取配置信息 @RequestMapping(“/getConfig”) public String getConfig() { String name = myconfig.name; return name; } } “` `@RestController`:和程序说明这是接收/返回网络数据的api `@RequestMapping` 的意思是:给方法或类设置一个”网址路径”,让外部可以通过这个网址来访问。 `@Autowired`: 自动注入对象。不需要构建函数方法啥的,开箱即用 `@Qualifier` 的意思是:当有多个同类型对象时,指定要使用哪一个。 – 一般和`@Autowired`一起用 – 在代码里的意思是调用`HelloWorldServiceImpl`接口创建方法 `@ResponseBody` 的意思是:将方法返回的对象直接转换成JSON/XML格式,作为HTTP响应体返回给前端。 – 可以和`@getMapping`一起用 **`@PathVariable` **的意思是:从URL路径中提取变量值。 – 网址:`/student/123` – `@PathVariable` 把其中的 `123` 抠出来 – 让你在代码中直接使用这个值 ##### 2.studentcontroller “`java package org.controller.spring_boot_project.controller; import org.controller.spring_boot_project.service.StudentService; import org.controller.spring_boot_project.vo.Student; import org.springframework.beans.factory.annotation.Autowired; import org.springframework.web.bind.annotation.PathVariable; import org.springframework.web.bind.annotation.RequestMapping; import org.springframework.web.bind.annotation.RequestParam; import org.springframework.web.bind.annotation.RestController; import java.util.List; //返回格式为json @RestController public class StudentControllrt { @Autowired StudentService studentService; // 输入一个学生id,使用@p提取值后返回数据库查找是否有对应的id数据 @RequestMapping(“/student/{id}”) public Student studentId(@PathVariable String id){ Student student = studentService.getStudentById(Integer.parseInt(id)); return student; } //该路径所有都映射到学生路径下,使用@RequestParam获取age中的变量,并返回到数据库中查询对应的值 //示例:http://localhost:8080/student?age=20 @RequestMapping(“/student”) public List getStudentByAge(@RequestParam Integer age){ List studentList = studentService.getStudentsByAge(age); return studentList; } } “` `@requestparam` 和 `@pathvariable` 区别: | 特性 | @RequestParam | @PathVariable | | :———– | :—————– | :—————– | | **参数位置** | URL问号?后面 | URL路径中 | | **URL示例** | `/users?id=123` | `/users/123` | | **语法** | `?key=value` | `/path/{variable}` | | **参数顺序** | 不重要 | 必须与路径定义一致 | | **适用场景** | 查询条件、过滤参数 | 资源标识、ID | ##### 3. systeminfocontroller `SystemInfoController` 的作用是**提供系统相关信息查询和管理的接口**。它是一个典型的系统监控和管理控制器。 “` package org.controller.spring_boot_project.controller; import io.swagger.v3.oas.annotations.Operation; import io.swagger.v3.oas.annotations.responses.ApiResponse; import io.swagger.v3.oas.annotations.responses.ApiResponses; import org.springframework.web.bind.annotation.PathVariable; import org.springframework.web.bind.annotation.RequestMapping; import org.springframework.web.bind.annotation.RestController; @RestController @RequestMapping(“/system”) public class SystemInfoController { //向程序说明这是一个接口功能 @Operation(summary = “Get a system by id”, description = “Returns a system detail”) //定义一个接口,类似蓝图,类 @ApiResponses(value = { @ApiResponse(responseCode = “200”, description = “成功返回”), @ApiResponse(responseCode = “404”, description = “找不到哦”) }) //实际上执行返回的操作:http://localhost:8080/info/200 @RequestMapping(“/info/{id}”) public String getSystemInfo(@PathVariable int id) { return “systemInfo” + id; } // 这段代码的意图是返回一个 appname:\”后台管理系统\的JSON 数据 @RequestMapping(“/info-error”) @ResponseBody public String getInfoWithError() { return “{\”appName\”: \”后台管理系统\”}”; } /** * 重定向到 Spring Boot 官方文档 * 访问路径: /system/docs */ @RequestMapping(“/docs”) public String redirectToDocs() { // 关键: 返回值以 “redirect:” 开头 return “redirect:https://spring.io/projects/spring-boot”; } } “` `@Operation`:给接下来的api接口一个描述说明 `@ApiResponses`:用来定义状态栏 `redirect`:返回重定向