1. 是什么
他是一个代码质量管理平台,用来管理代码质量。 我们在把文件pull到jenkins时可以在构建前通过加入SonarQube来检测代码质量。它的运行机制是使用不同的插件算法来对结果进行再加工,并最终以量化的方式来衡量代码质量。
它自带了一个数据库,但是内容很小,我们在部署的时候可以使用别的。
老版本支持使用mysql,但新版本不让
2. 配置
流程图be like: img src=”https://wandercc0321.top/PicGo20250531213314361.png”/
1. 编写yml文件
我们新建一个文件夹,在里边写上数据库和sonar的yml。
[root@localhost sqon]# docker pull sonarqube:8.9.6-community
[root@localhost sqon]# docker pull postgres
[root@localhost ~]# cd /usr/local/docker/sqon/
[root@localhost sqon]# vim docker-compose-sqon.yml
[root@localhost sqon]# ls
docker-compose-sqon.yml
yml配置如下:
version: '3.1'
services:
db:
image: postgres
container_name: db
ports:
- "5432:5432"
networks: #网络控制
- sonarnet
environment:
POSTGRES_USER: sonar
POSTGRES_PASSWORD: sonar
sonarqube:
image: sonarqube:8.9.6-community
container_name: sonarqube
depends_on: #要先db启动完再来启动
- db
ports:
- "9000:9000"
networks: #和上一个一样,表示在同一个容器
- sonarnet
environment:
SONAR_JDBC_URL: jdbc:postgresql://db:5432/sonar
SONAR_JDBC_USERNAME: sonar
SONAR_JDBC_PASSWORD: sonar
networks: #让两个容器网络作桥接
sonarnet:
driver: bridge
之后使用喜闻乐见的compose命令启动即可。 在浏览器打开,一开始默认的账号密码都是admin 修改后进来就好啦 
3. 使用插件scanner
下载地址:SonarScanner CLI | SonarQube Server Documentation
我下的是4.6.0版本
下载后通过远程拖进虚拟机,并使用unzip进行解压 解压完后拖进jenkins的data目录下即可
[root@localhost ~]# ls
anaconda-ks.cfg jdk-8u451-linux-x64.tar.gz
apache-maven-3.8.8-bin.tar.gz sonar-scanner-cli-4.6.0.2311-linux.zip
[root@localhost ~]# unzip sonar-scanner-cli-4.6.0.2311-linux.zip
[root@localhost ~]# mv sonar-scanner-4.6.0.2311-linux/ sonar-scanner/
[root@localhost ~]# mv sonar-scanner/ /usr/local/docker/jenkins/data/
[root@localhost data]# cd sonar-scanner/
...
[root@localhost sonar-scanner]# ls
bin conf jre lib
[root@localhost sonar-scanner]# cd conf/
[root@localhost conf]# ls
sonar-scanner.properties
[root@localhost conf]# vim sonar-scanner.properties
这里要修改一些sonar-scanner的基础配置
[root@localhost conf]# vim sonar-scanner.properties
  1 #Configure here general information about the environment, such as SonarQube server connection details
  2 #No information about specific project should appear here
  3
  4 #----- Default SonarQube server
  5 sonar.host.url=http://10.10.10.11:9000 #你的ip
  6
  7 #----- Default source code encoding
  8 sonar.sourceEncoding=UTF-8 #把前边注释删掉
  9
[root@localhost sonar-scanner]# ls
bin conf jre lib
[root@localhost sonar-scanner]# cd bin
[root@localhost bin]# ls
sonar-scanner sonar-scanner-debug
[root@localhost bin]# pwd
/usr/local/docker/jenkins/data/sonar-scanner/bin
#由于没有配置sonar-scanner的环境,要使用命令时需要带上前边的绝对路径来指定
当我们使用时会报错:
[root@localhost test]# /usr/local/docker/jenkins/data/sonar-scanner/bin/sonar-scanner -Dsoanr.source=./ -Dsonar.projectname=linux-test
ERROR: Error during SonarScanner execution
ERROR: Not authorized. Analyzing this project requires authentication. Please provide a user token in sonar.login or other credentials in sonar.login and sonar.password.
这是因为我们没有权限导致的。我们可以指定token的方式来获取权限: 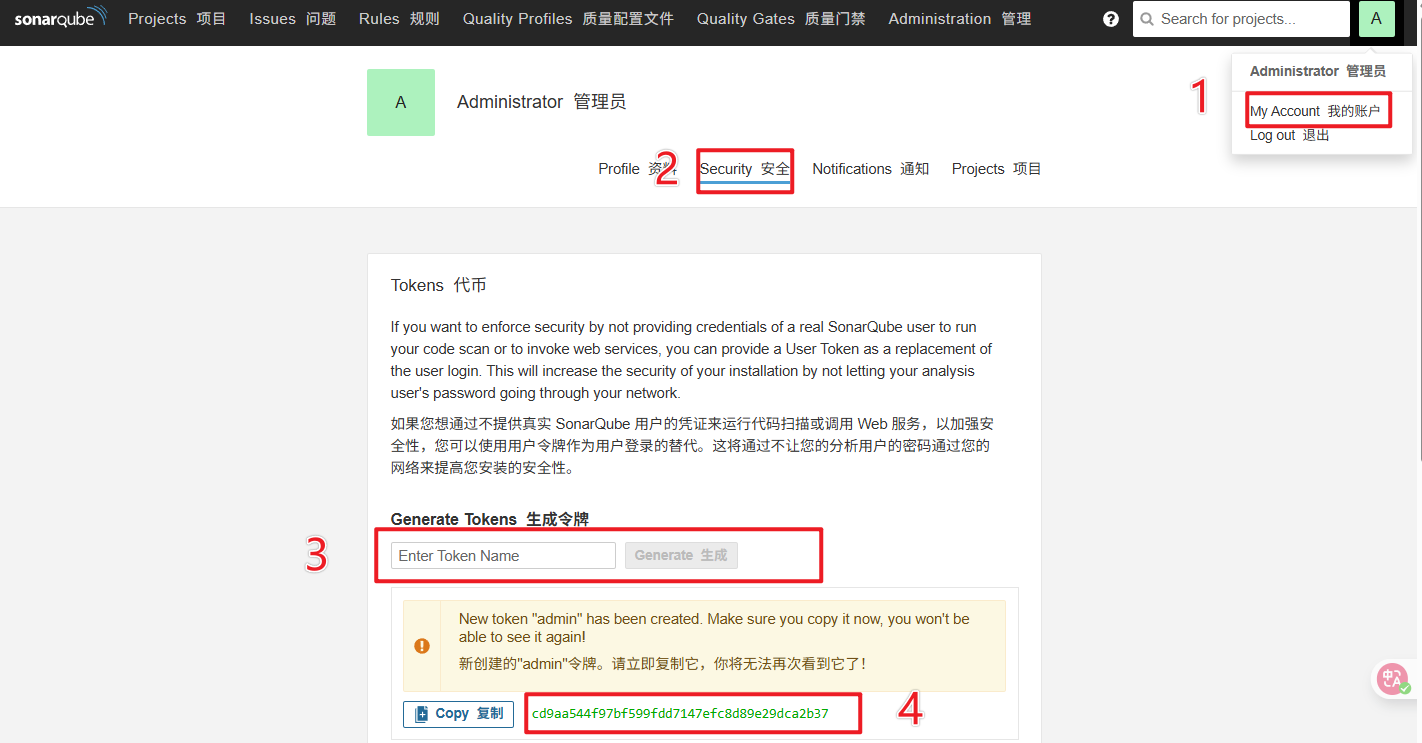
[root@localhost test]# /usr/local/docker/jenkins/data/sonar-scanner/bin/sonar-scanner -Dsoanr.source=./ -Dsonar.projectname=linux-test -Dsonar.login=cd9aa544f97bf599fdd7147efc8d89e29dca2b37 -Dsonar.projectKey=linux-test
...
ERROR:
ERROR: Re-run SonarScanner using the -X switch to enable full debug logging.
这次也报错了。 但是报错的原因是因为不知道编译后的java包在哪,只要你的java包测试成功,在原先的命令上带着- Dsonar.java.binaries=(编译好的java包所在地),即可测试完成。 我自己没做这一步,做的所有java项目到编译时就会出现各种各样的报错,所以就测试到了这一步就停止了。
-Dsoanr.source= 检测的代码路径 Dsonar.projectname= 文件名 Dsonar.login = 通信凭证 Dsonar.projectKey =取一个对应的key名
4. 和jenkins整合
先去jenkins下载插件 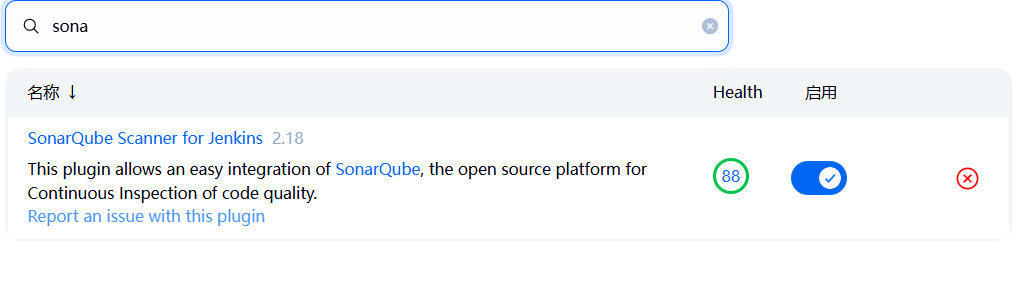 把这个下载好后启用,进去系统配置填上信息
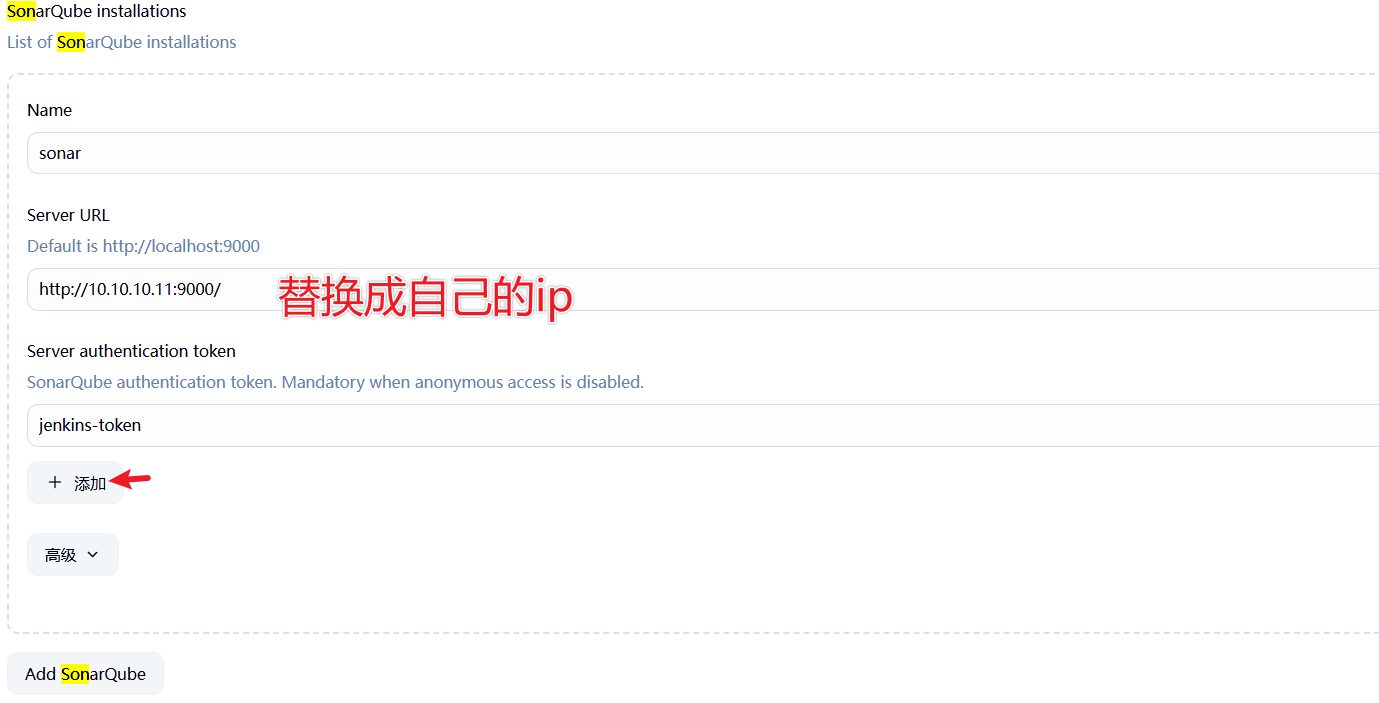
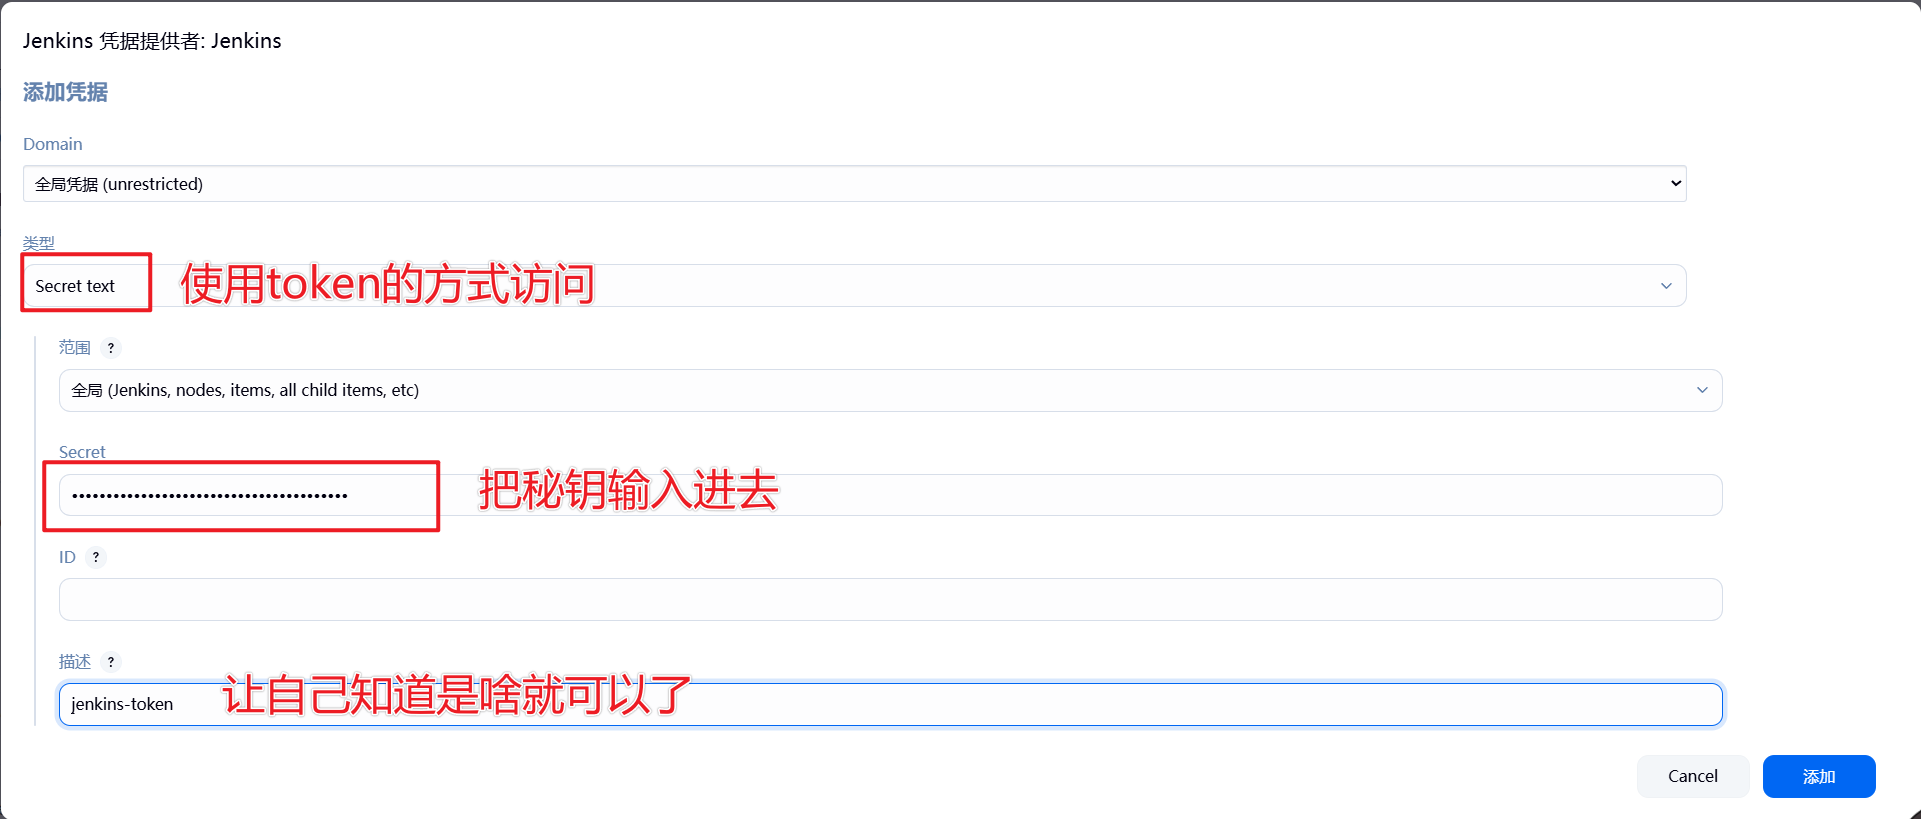 保存即可
保存即可
保存后去全局工具配置上填写相关信息如下:  配置好后对一个项目的build进行配置
 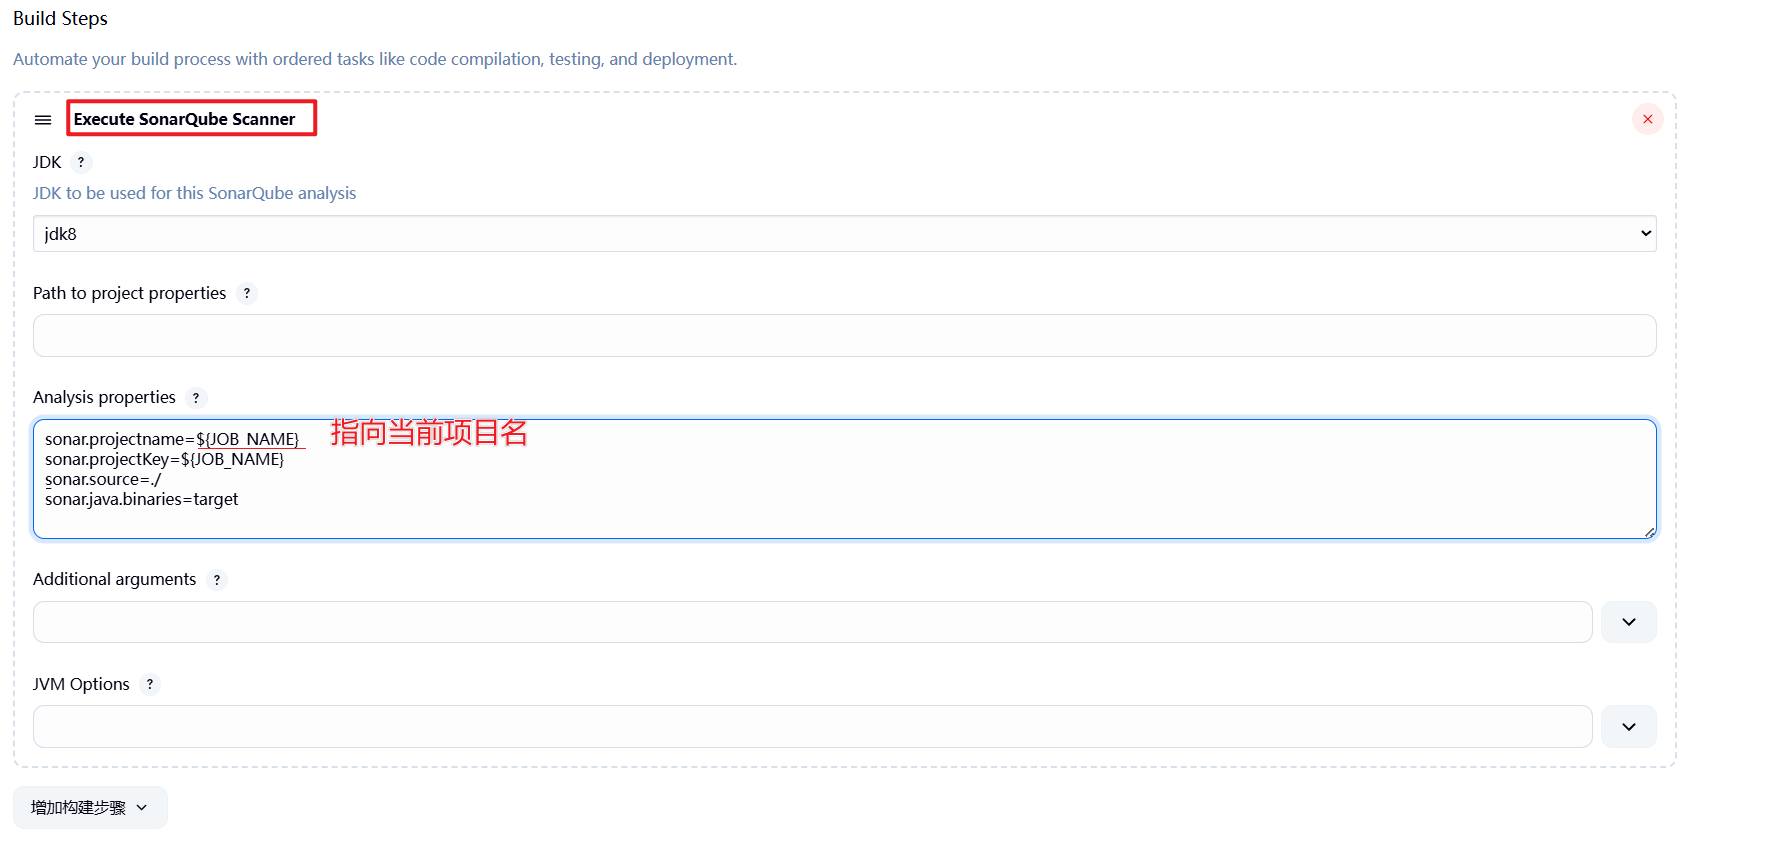 配置好后就会出现这个标,框架大概就搭好了
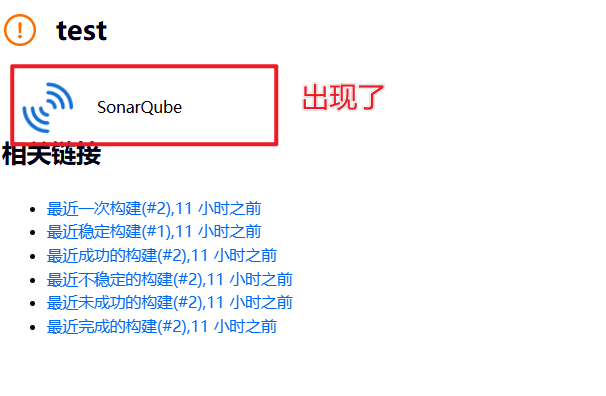
这样,整个配置就完成了。至于我为啥没有测试,原因同上… 感觉java好难